Build Your First AI Agent
Learn how to build AI agents with custom tools, APIs, and realtime workflows using Pipecat.
Build Your First AI Agent with Pipecat
Building AI agents traditionally requires managing backend orchestration, tool execution, APIs, routing logic, streaming infrastructure, and deployment systems.
Pipecat simplifies this into a visual workflow builder where you can create, debug, and deploy AI agents directly from a canvas interface. Pipecat supports multiple LLM providers, custom tools, realtime execution, structured outputs, and public APIs — all without writing orchestration code.
In this tutorial, you'll build your first AI agent using the Pipecat visual workflow canvas.
What You'll Build
By the end of this guide you'll learn how to:
- Create an AI workflow visually
- Configure your preferred LLM provider
- Add tools to your agent
- Customize prompts and execution settings
- Enable structured outputs
- Define output schemas
- Build production-ready AI workflows
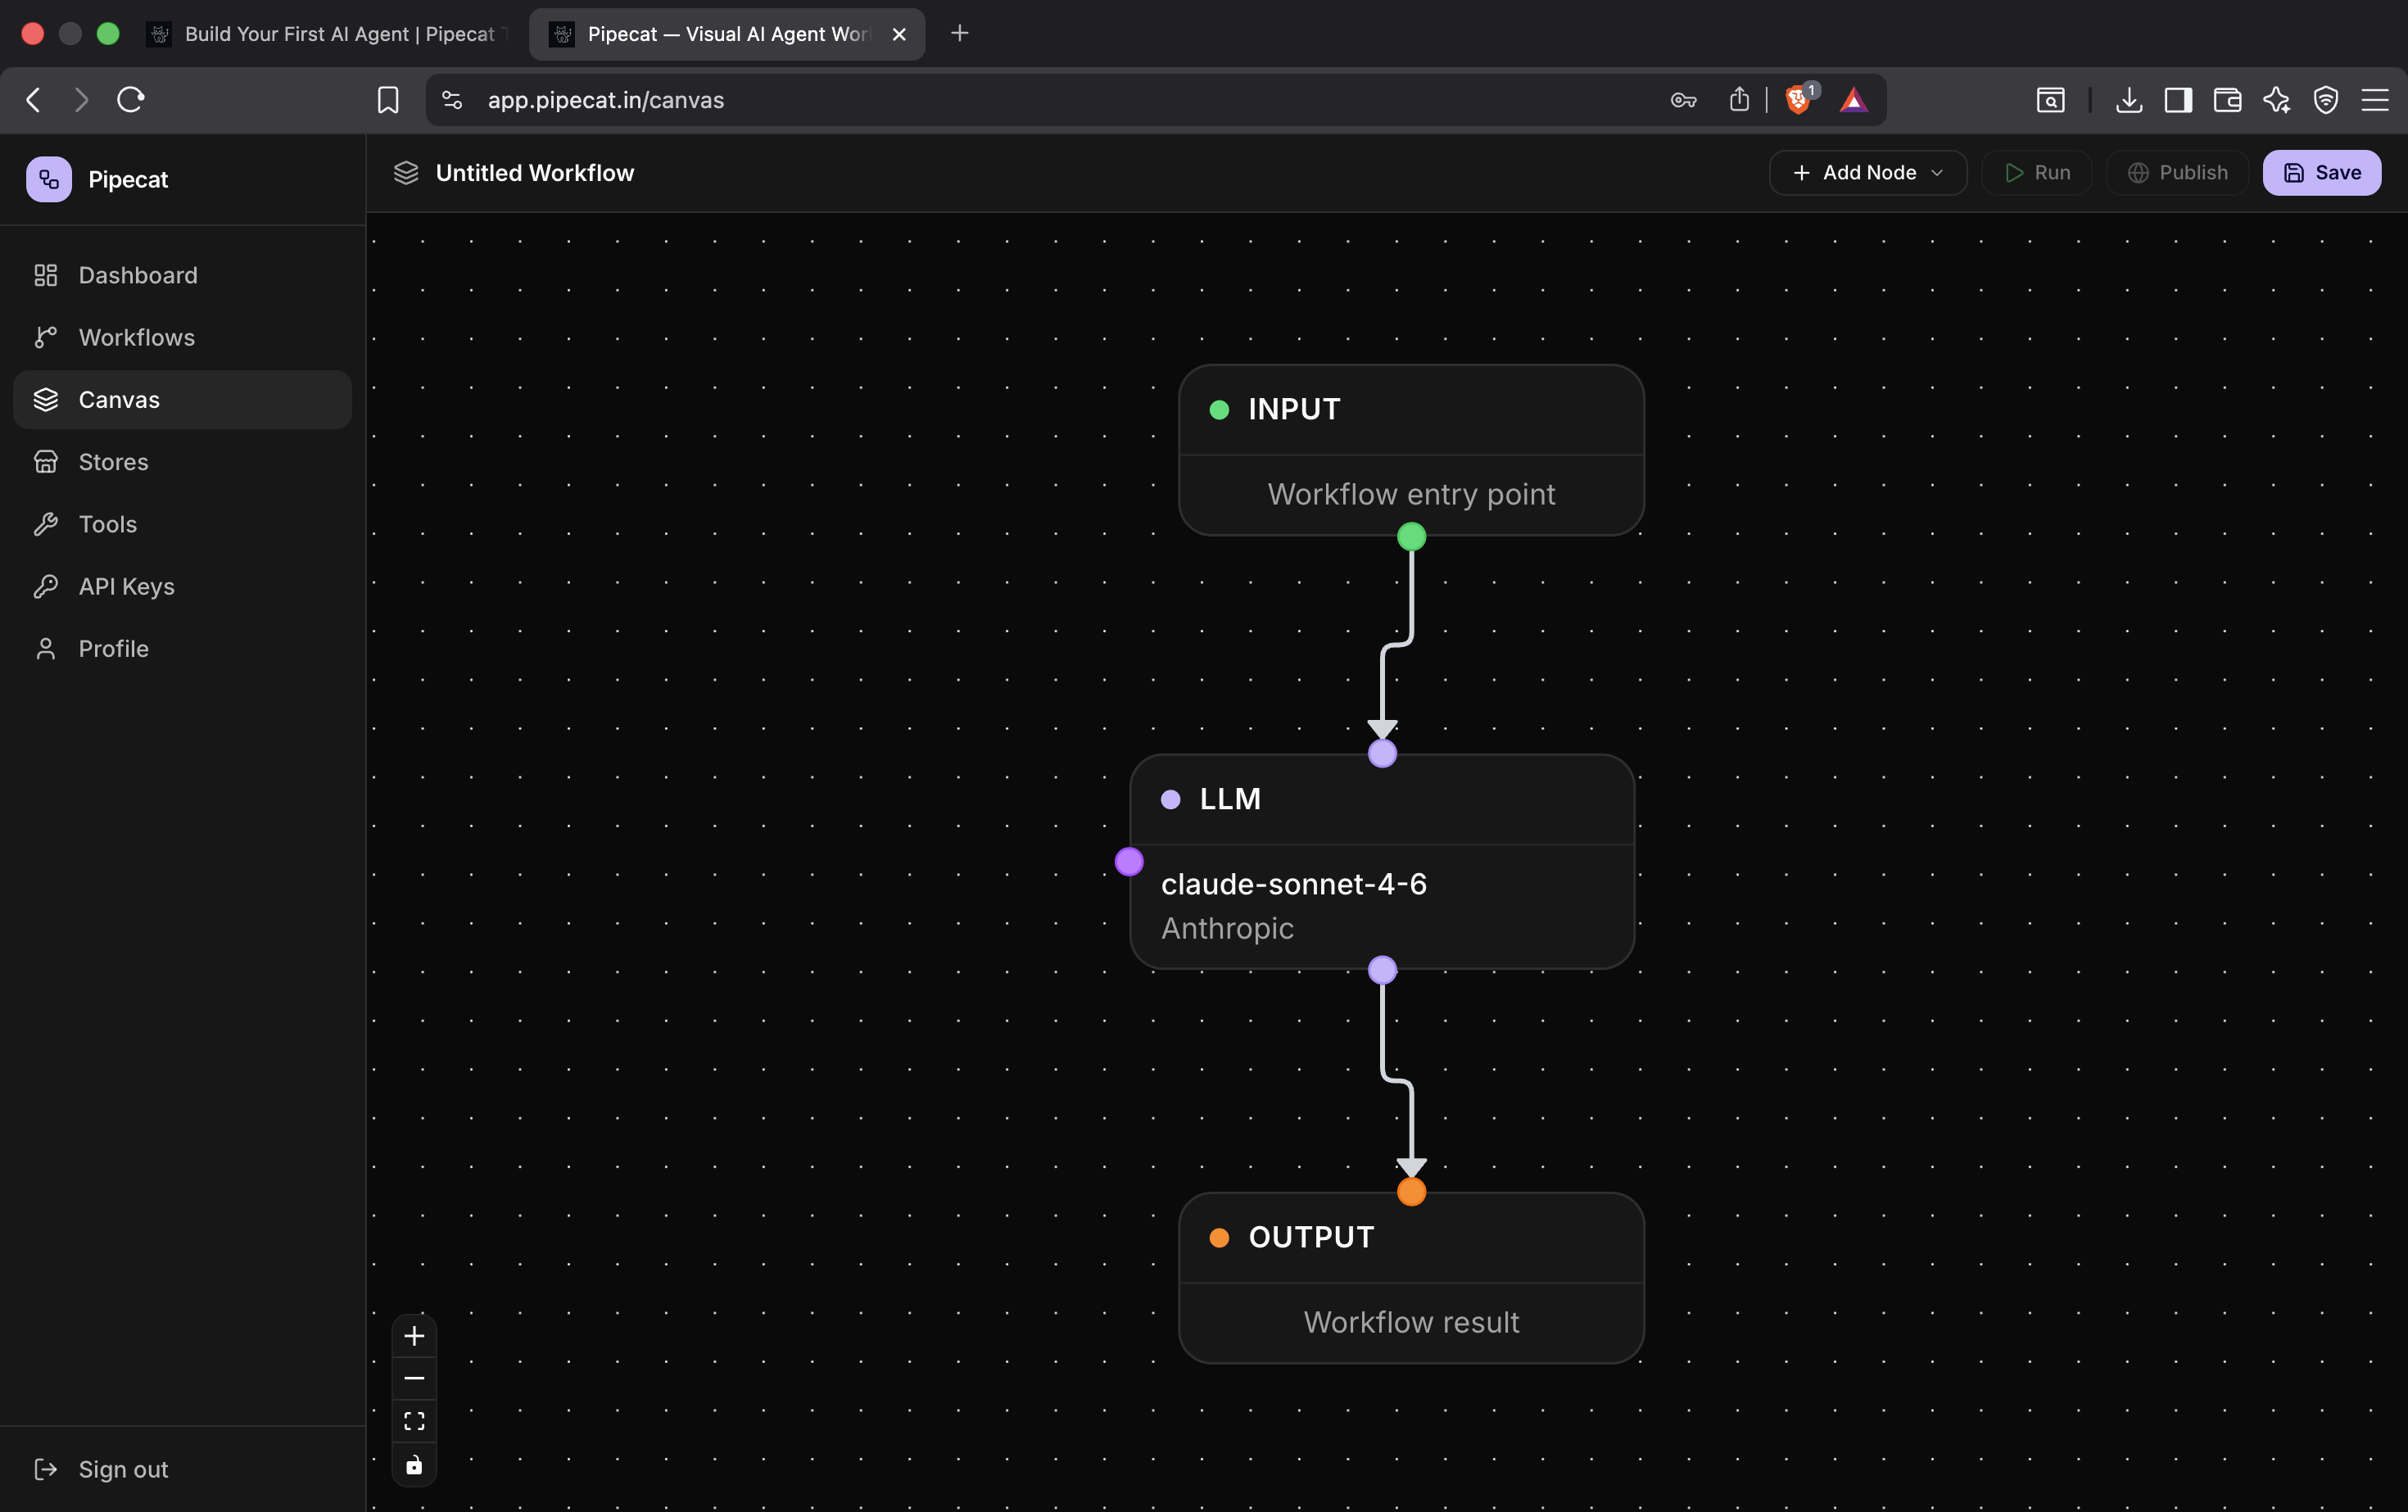
Step 1 — Open the Canvas
After signing up and logging into Pipecat, open the workflow canvas.
Pipecat automatically provides a starter workflow:
Input → LLM → Output
This is the core execution graph of your AI agent.
- The Input node receives user input
- The LLM node performs reasoning and tool execution
- The Output node returns the final response
Pipecat makes the agent graph visible directly on the canvas so you can visually understand how your workflow executes in realtime.
Understanding the Workflow
Every AI agent fundamentally consists of:
- Input handling
- Model reasoning
- Tool execution
- Output generation
Pipecat converts these concepts into a visual DAG (Directed Acyclic Graph) builder where nodes execute in topological order.
As your workflows grow, you can add:
- Multiple LLM nodes
- Custom tools
- Parallel branches
- Structured outputs
- Streaming execution
- Public APIs
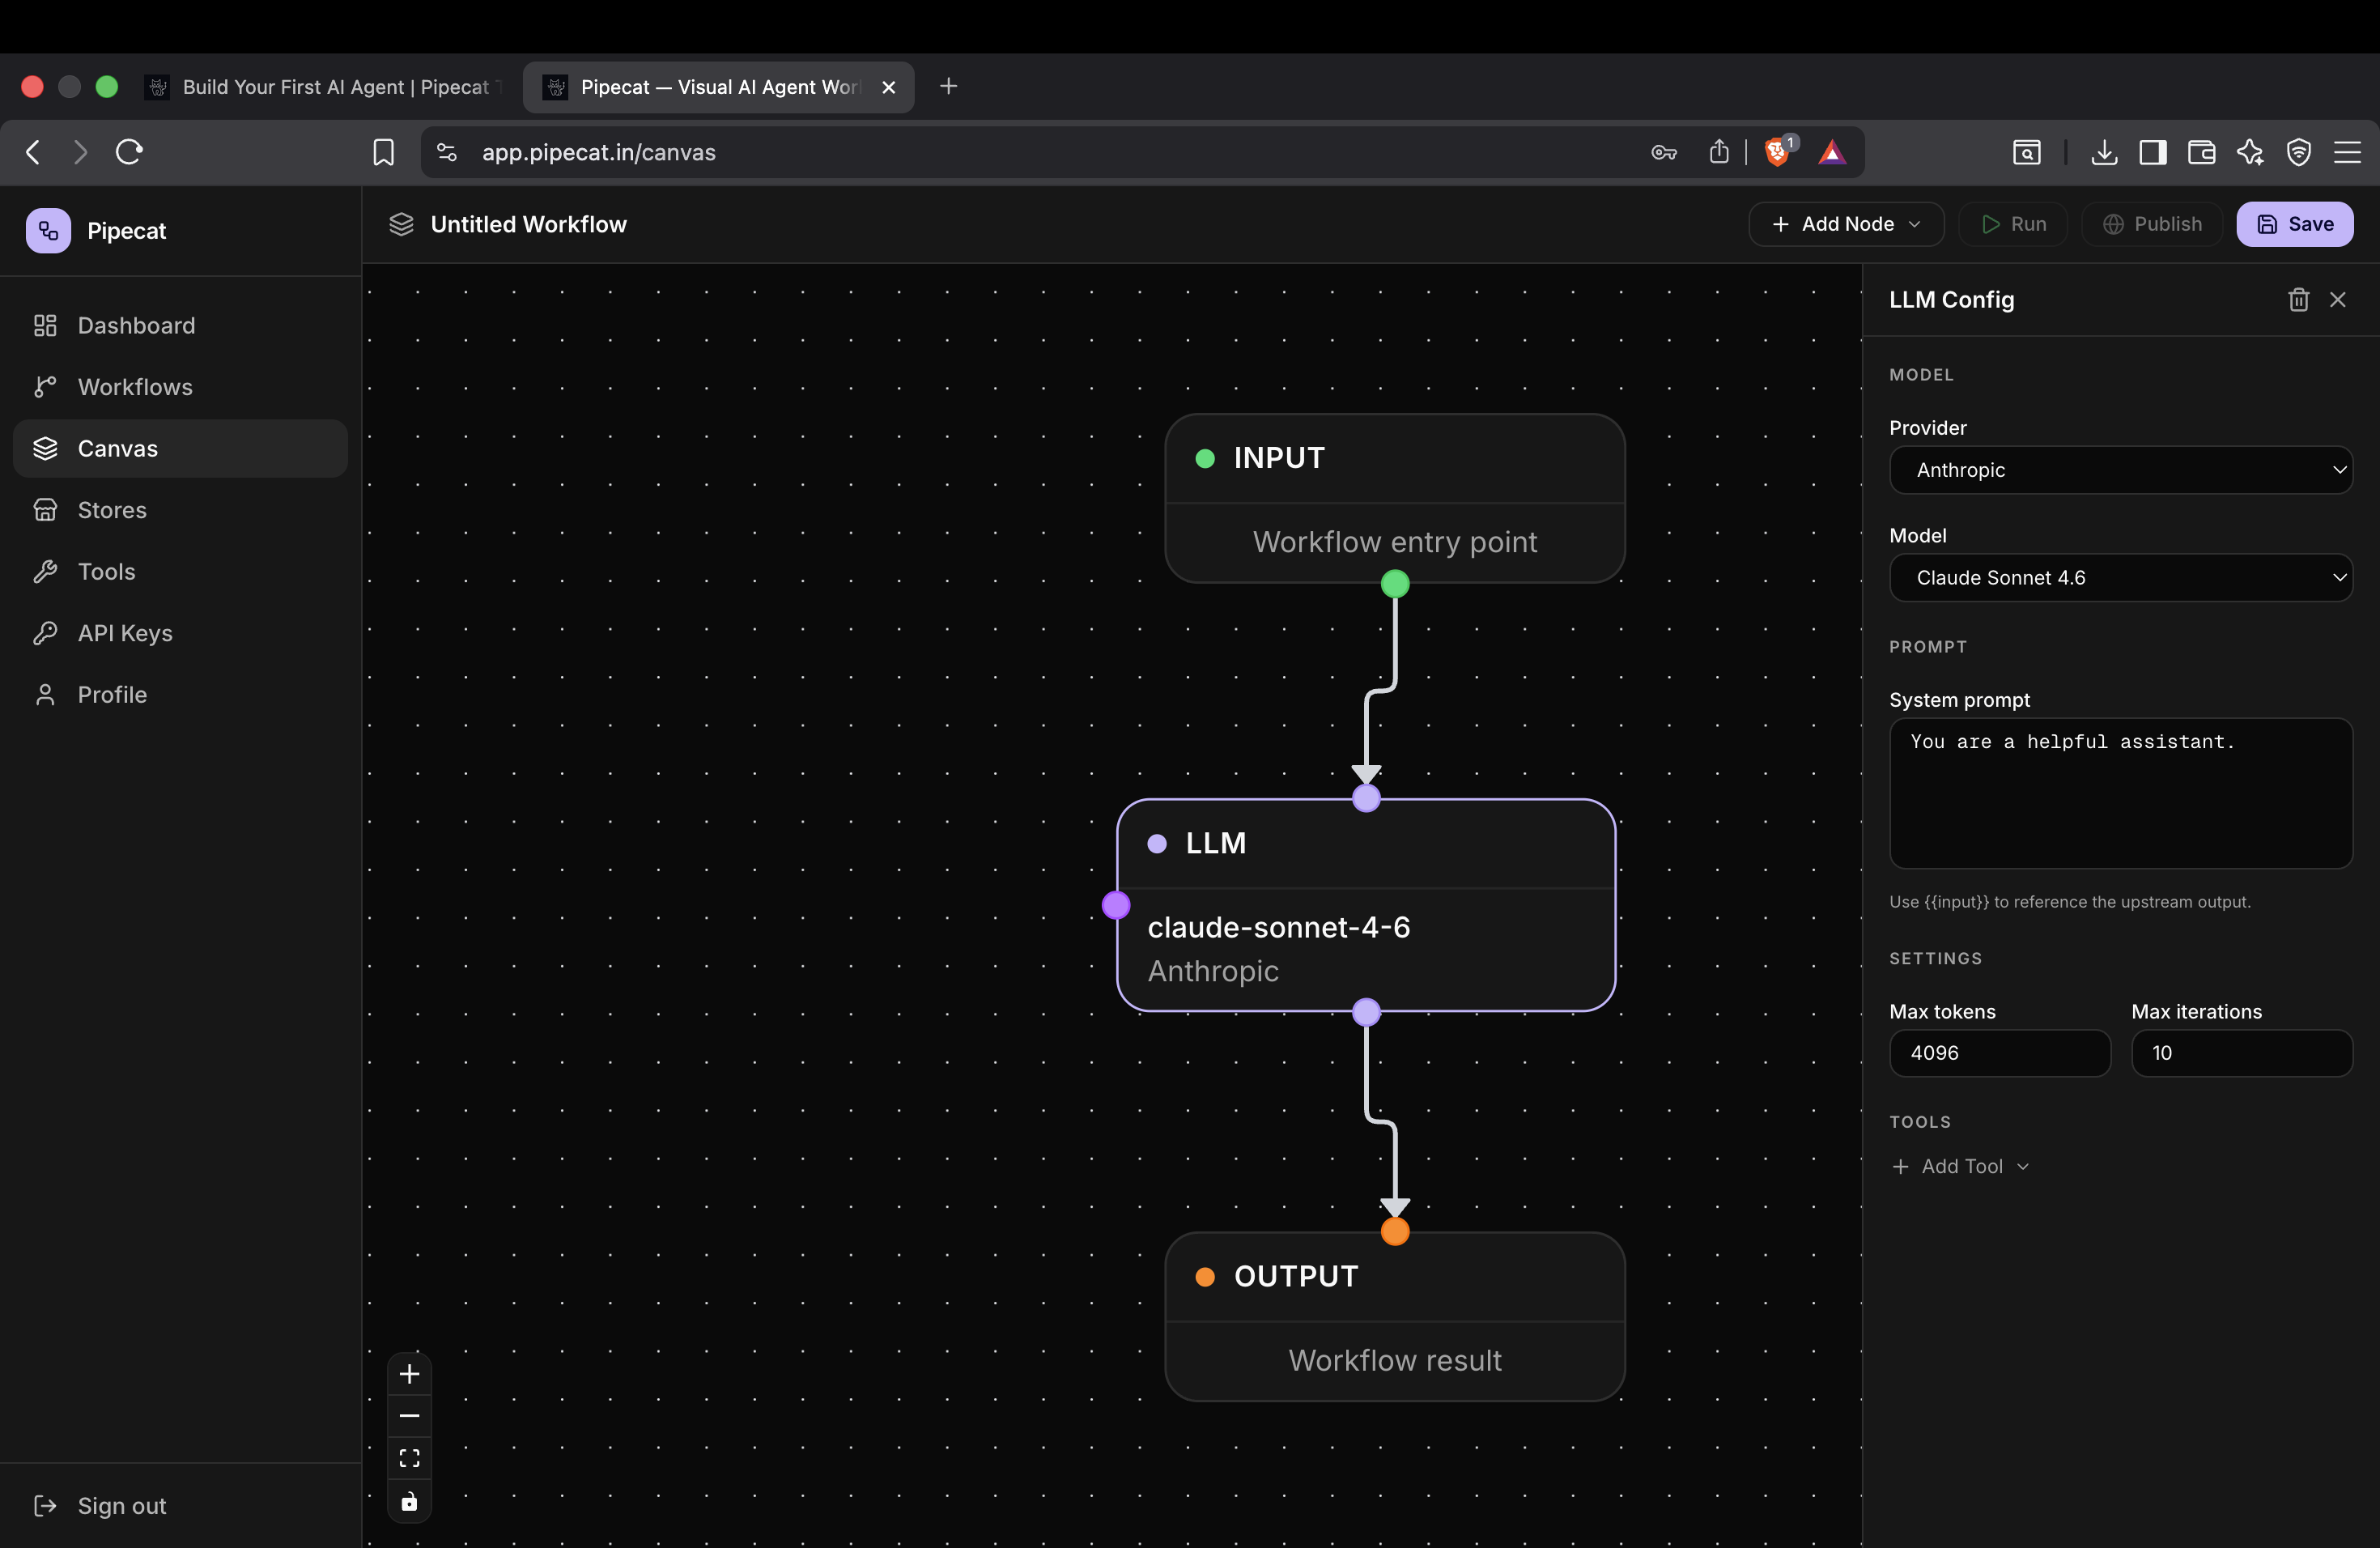
Step 2 — Configure Your LLM
Click on the LLM node to open the configuration panel.
Pipecat supports multiple providers including:
- OpenAI
- Anthropic
- Gemini
- OpenRouter
You can either:
- Select a provider
- Choose a model from the dropdown
- Or manually enter a custom model ID
This makes it easy to experiment with different models without changing your workflow architecture.
Choosing the Right Model
Different models are optimized for different tasks.
| Use Case | Suggested Models |
|---|---|
| Fast chat agents | GPT-4.1 Mini, Claude Haiku |
| Deep reasoning | Claude Sonnet, GPT-4.1 |
| Cost optimization | Gemini Flash |
| Open-source routing | OpenRouter |
Pipecat allows you to switch models instantly from the canvas without rebuilding the workflow.
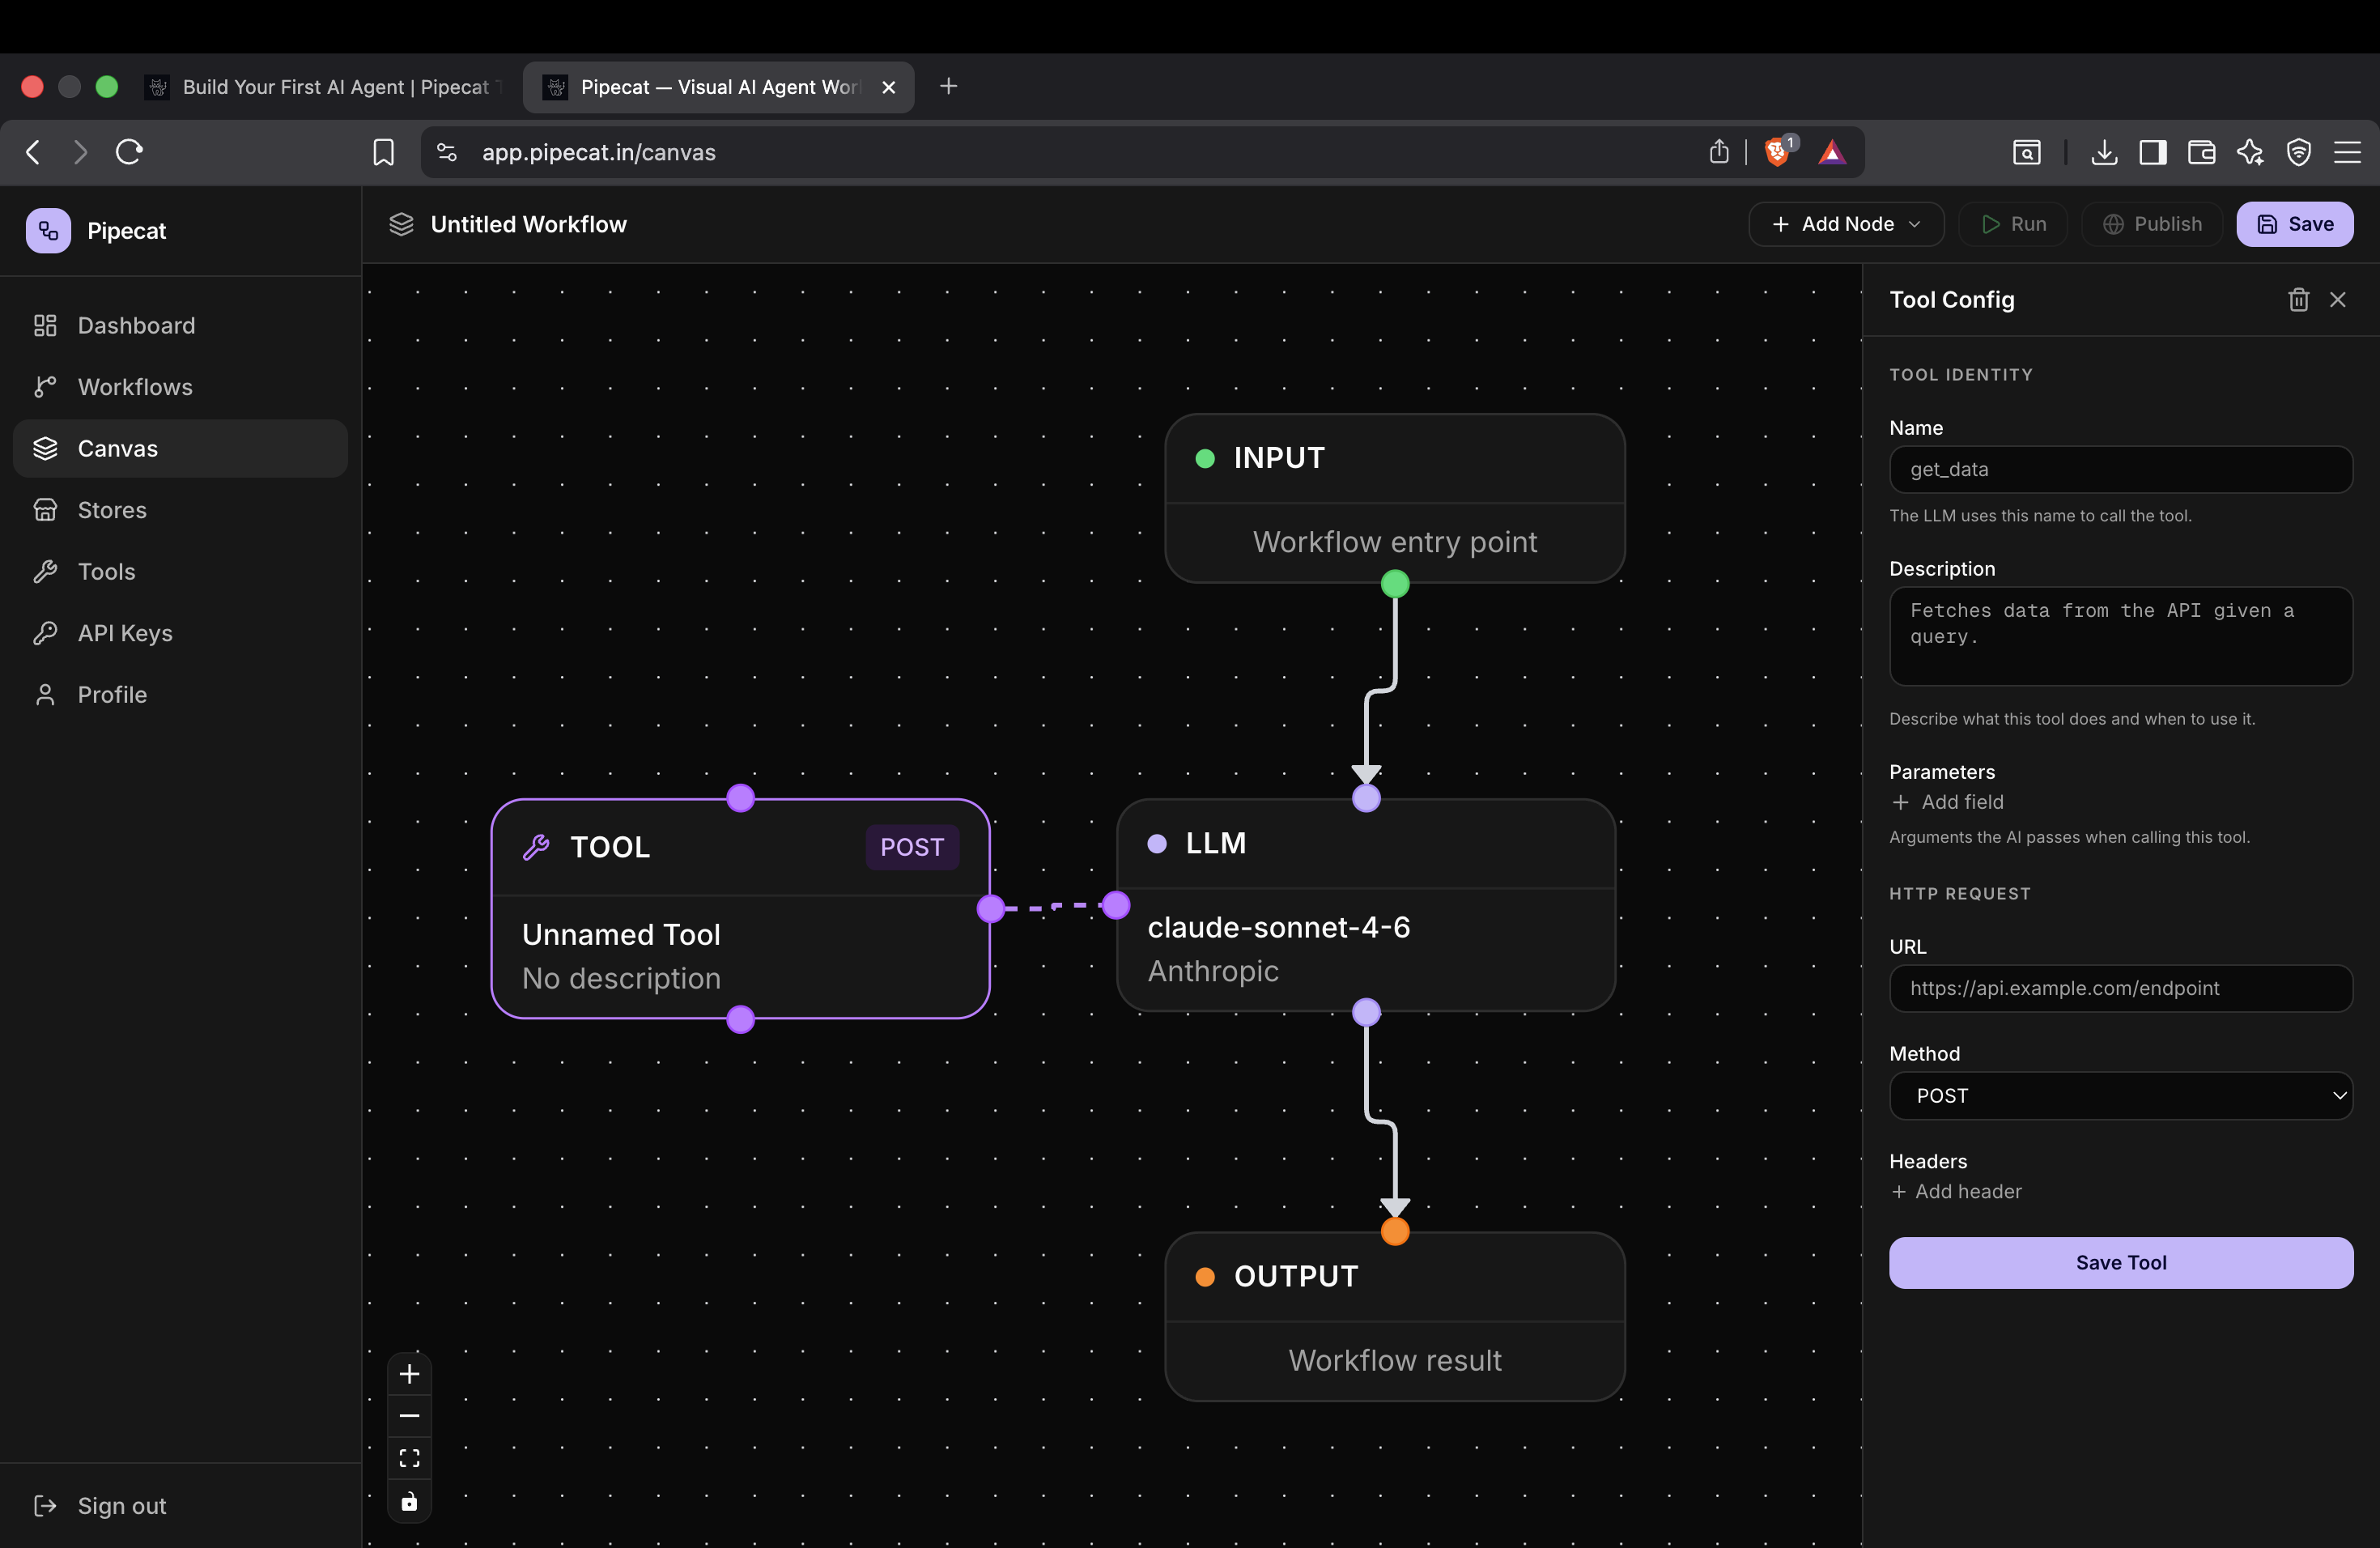
Step 3 — Configure Tools
AI agents become significantly more powerful when they can interact with external systems.
Pipecat allows LLM nodes to call tools during execution.
To configure tools:
- Click the LLM node
- Click Add Tool
- Select the tool you created earlier
These tools can include:
- HTTP APIs
- Internal backend services
- Search systems
- Databases
- External integrations
Pipecat automatically exposes these tools to the LLM during execution.
Create Custom Tools First
If you haven't created tools yet, follow the custom tools guide first.
How to Create Custom Tools in Pipecat
This guide covers:
- Tool schemas
- HTTP integrations
- Parameters
- Authentication
- Tool execution flows
Step 4 — Configure Prompt and Execution Settings
Inside the LLM configuration panel you can also customize advanced settings.
Max Output Tokens
Controls the maximum response length generated by the model.
Higher values:
- Allow longer responses
- Increase cost and latency
Lower values:
- Reduce token usage
- Improve response speed
Max Output Iterations
Controls how many reasoning or tool execution cycles the agent can perform before finishing.
This is useful for:
- Multi-step workflows
- Tool-heavy agents
- Research pipelines
- Retrieval systems
Customize the Prompt
You can fully customize the system prompt used by the model.
Example:
You are a helpful AI assistant specialized in customer support.
Always respond professionally and concisely.
Prompt engineering has a massive impact on:
- Tool usage behavior
- Response quality
- Structured outputs
- Hallucination reduction
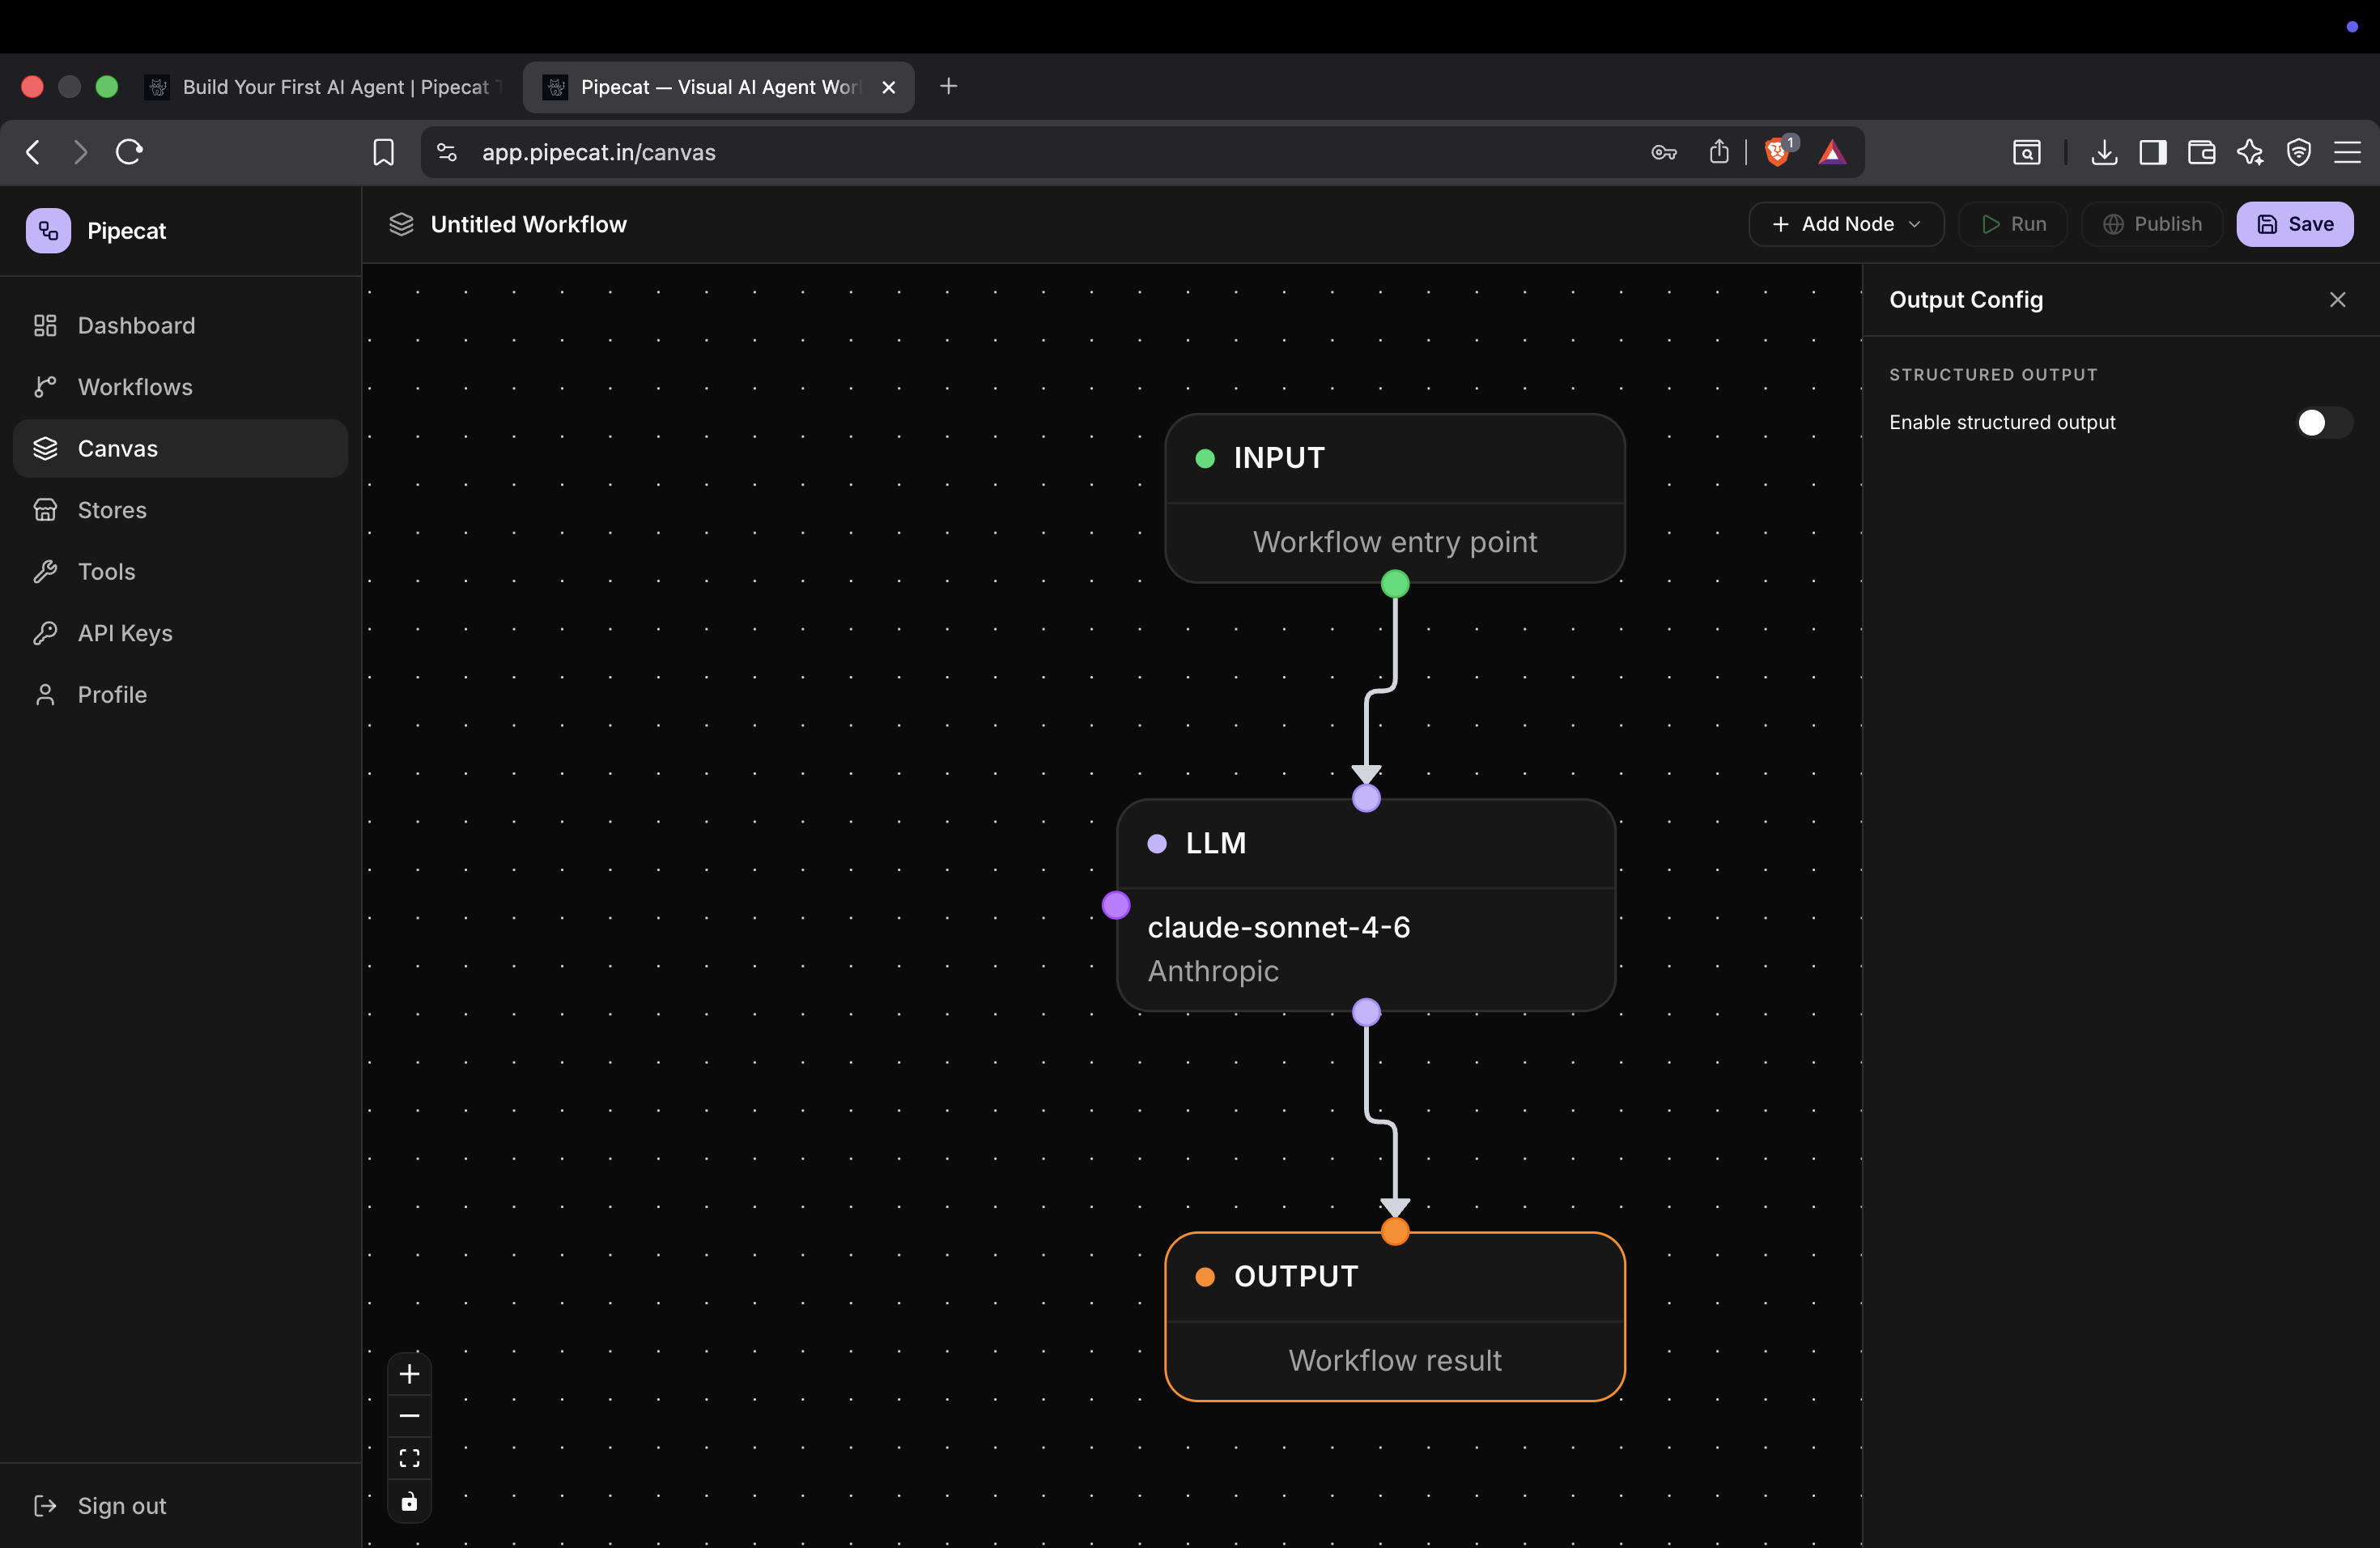
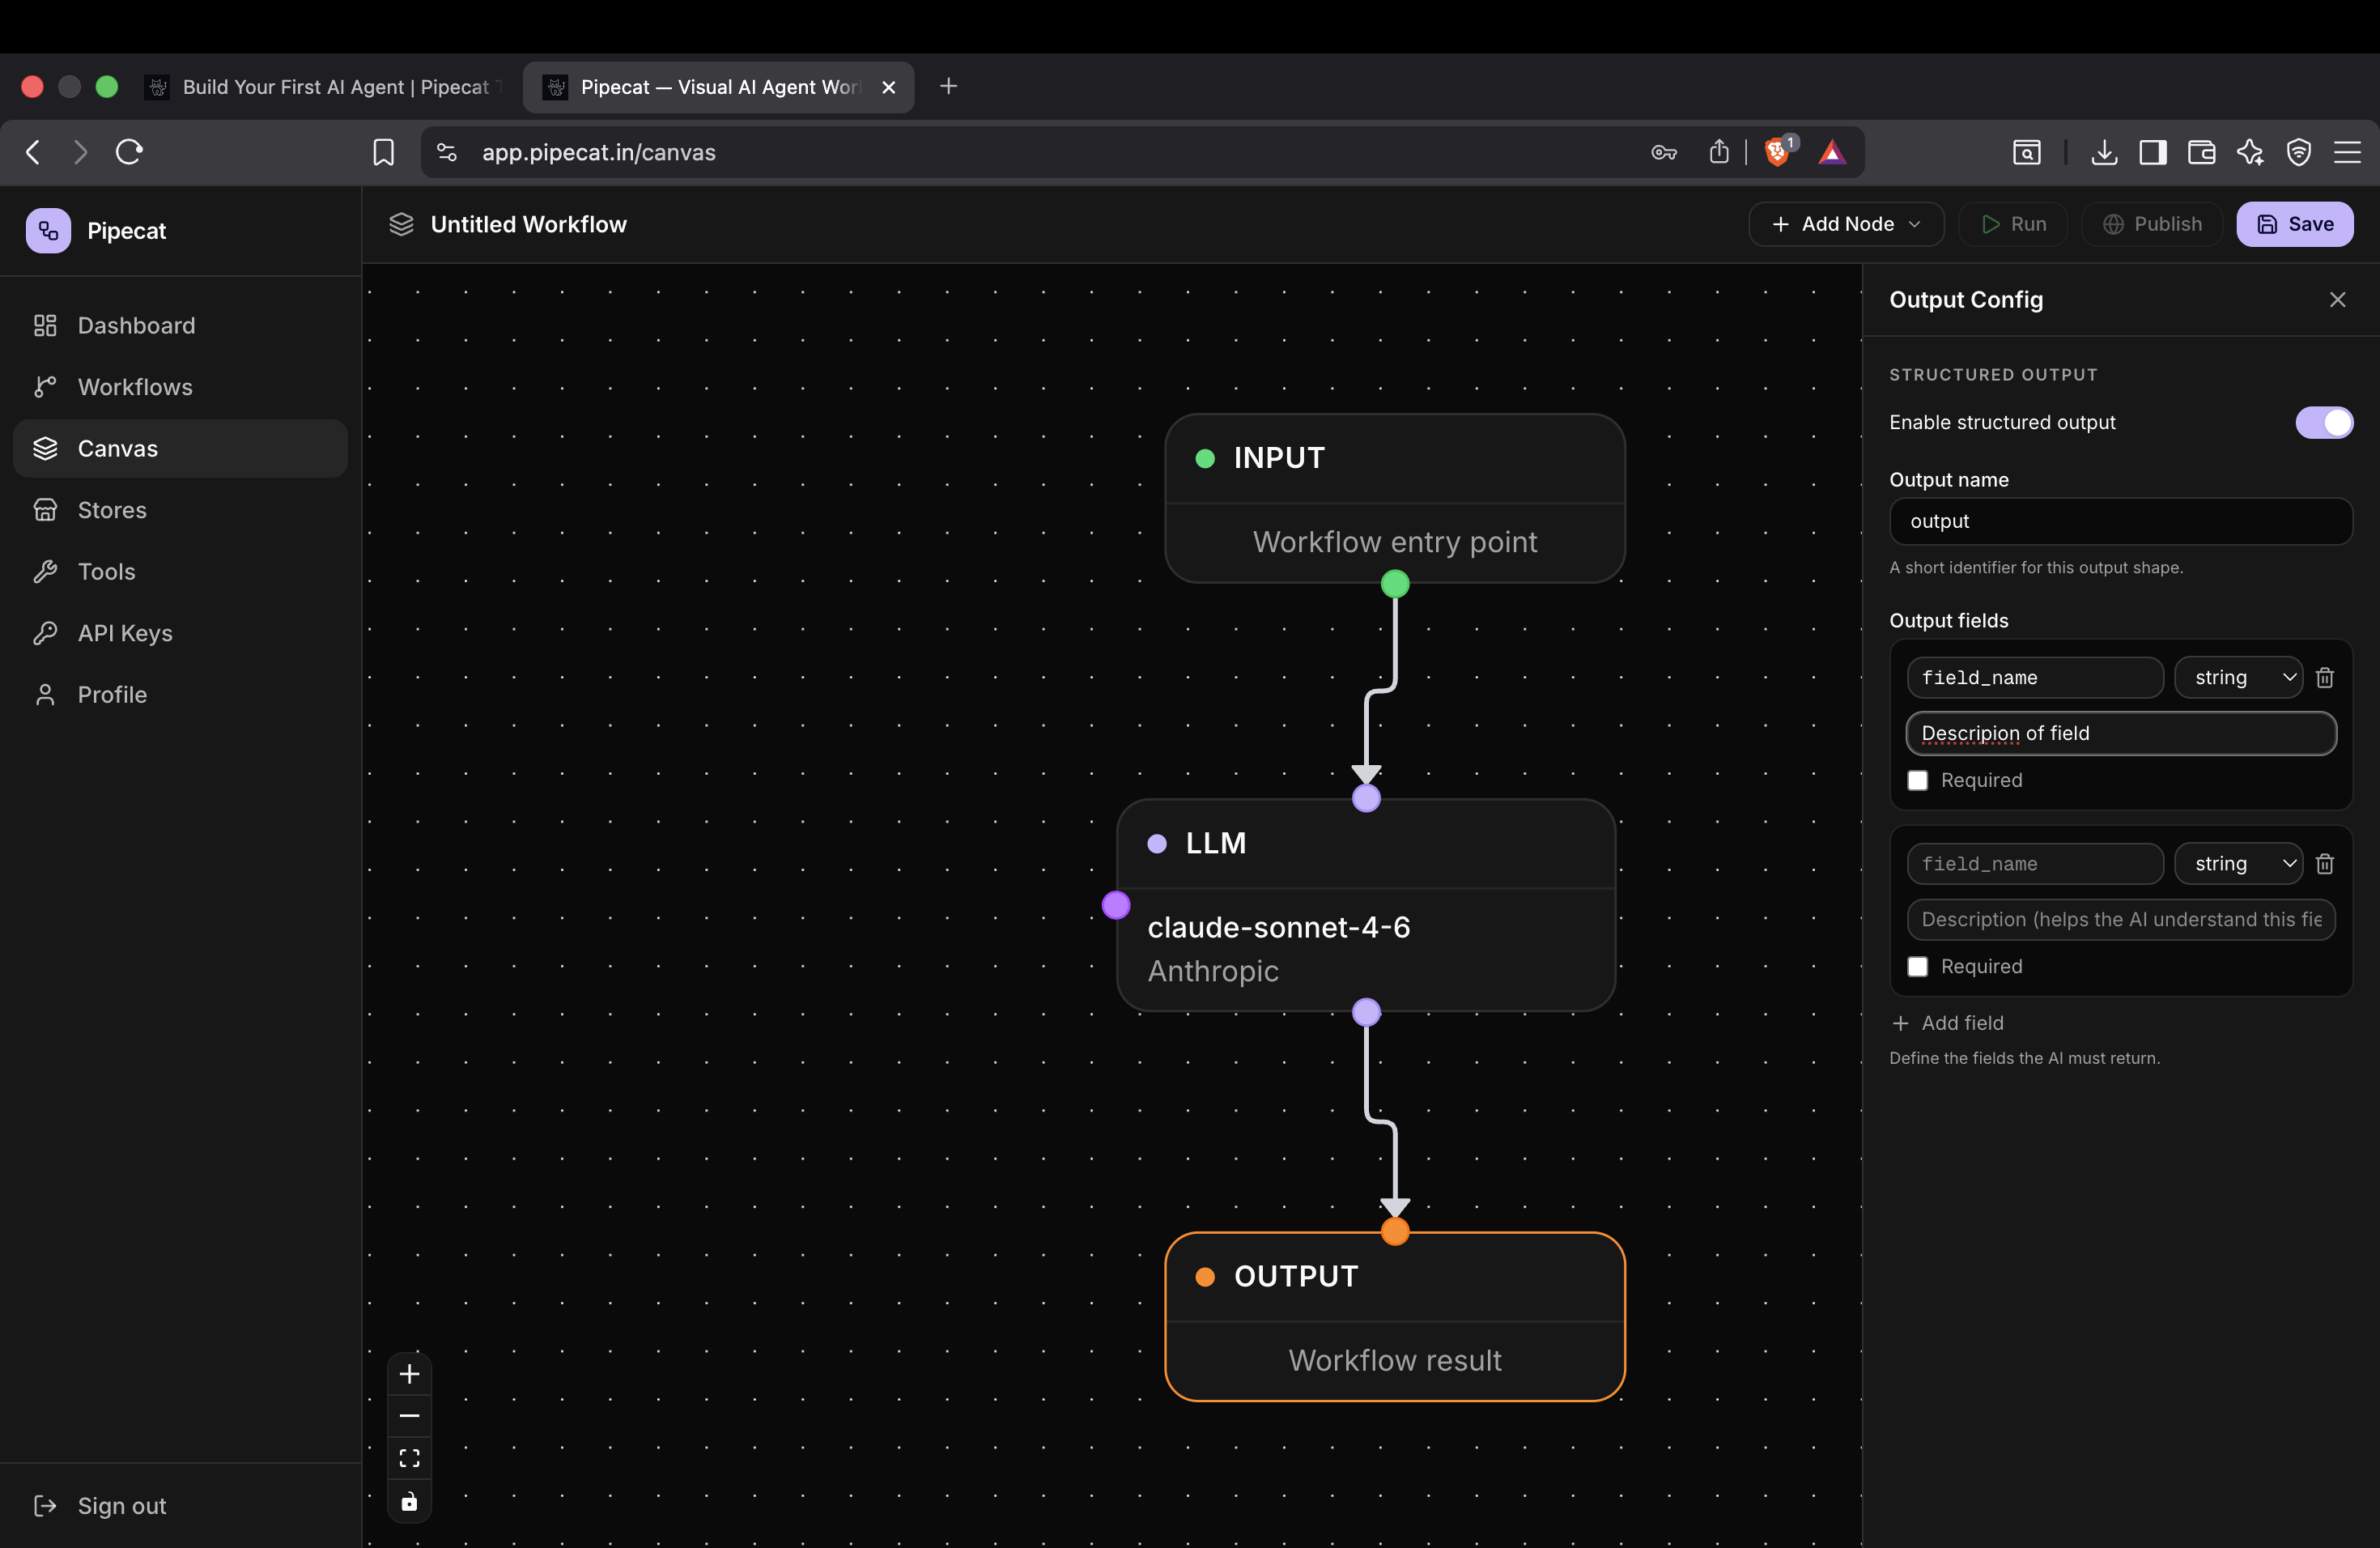
Step 5 — Enable Structured Output
Structured outputs allow your AI agent to return predictable JSON responses instead of plain text.
This is extremely useful when building:
- APIs
- Frontend integrations
- Workflow systems
- Automations
- Data extraction pipelines
To enable structured output:
- Click the Output node
- Enable the Structured Output toggle
Step 6 — Define Output Fields
Once structured output is enabled, you can define output fields manually.
Each field contains:
- Name
- Type
- Description
The description helps the LLM understand what kind of response should be generated.
Example schema:
| Field | Type | Description |
|---|---|---|
| summary | string | Short summary of the response |
| confidence | number | Confidence score between 0 and 1 |
| sources | array | List of referenced sources |
Pipecat then guides the model to generate responses matching this schema.
Why Structured Outputs Matter
Without structured outputs, AI responses can vary heavily in formatting.
Structured outputs make AI agents:
- Reliable
- Machine-readable
- API-friendly
- Easier to automate
This becomes extremely important for:
- Agent orchestration
- Workflow pipelines
- Frontend rendering
- Automation systems
- AI integrations
Realtime Streaming and Execution
Pipecat supports realtime execution streaming directly on the canvas.
As workflows execute you can see:
- Live node states
- Tool execution
- Streaming responses
- Parallel execution
- Realtime updates
This makes debugging significantly easier compared to manually orchestrating AI systems in backend code.
Final Thoughts
Pipecat makes AI workflow orchestration visual, scalable, and production-ready.
Instead of manually wiring together:
- APIs
- Tool execution
- Streaming systems
- Routing logic
- Structured outputs
you can build everything directly from the canvas interface.
Pipecat supports:
- Realtime streaming
- Public APIs
- Custom tools
- Parallel execution
- Structured outputs
- Multi-provider LLM orchestration
This allows you to move from prototype to production significantly faster.
Next Tutorial
Continue learning with: